If you are a regular user of Office 365, you will want to find out more about how you can improve the day to day collaboration across your business.
Don’t worry, as in our latest tips and tricks article, we provide you with 3 ways to increase your collaboration in Office 365.
1 – Create and save your documents to the Cloud by default
No matter whether you are looking to work on a document with others or simply share it for review, the documents that you create will be much more secure when saved to the Cloud.
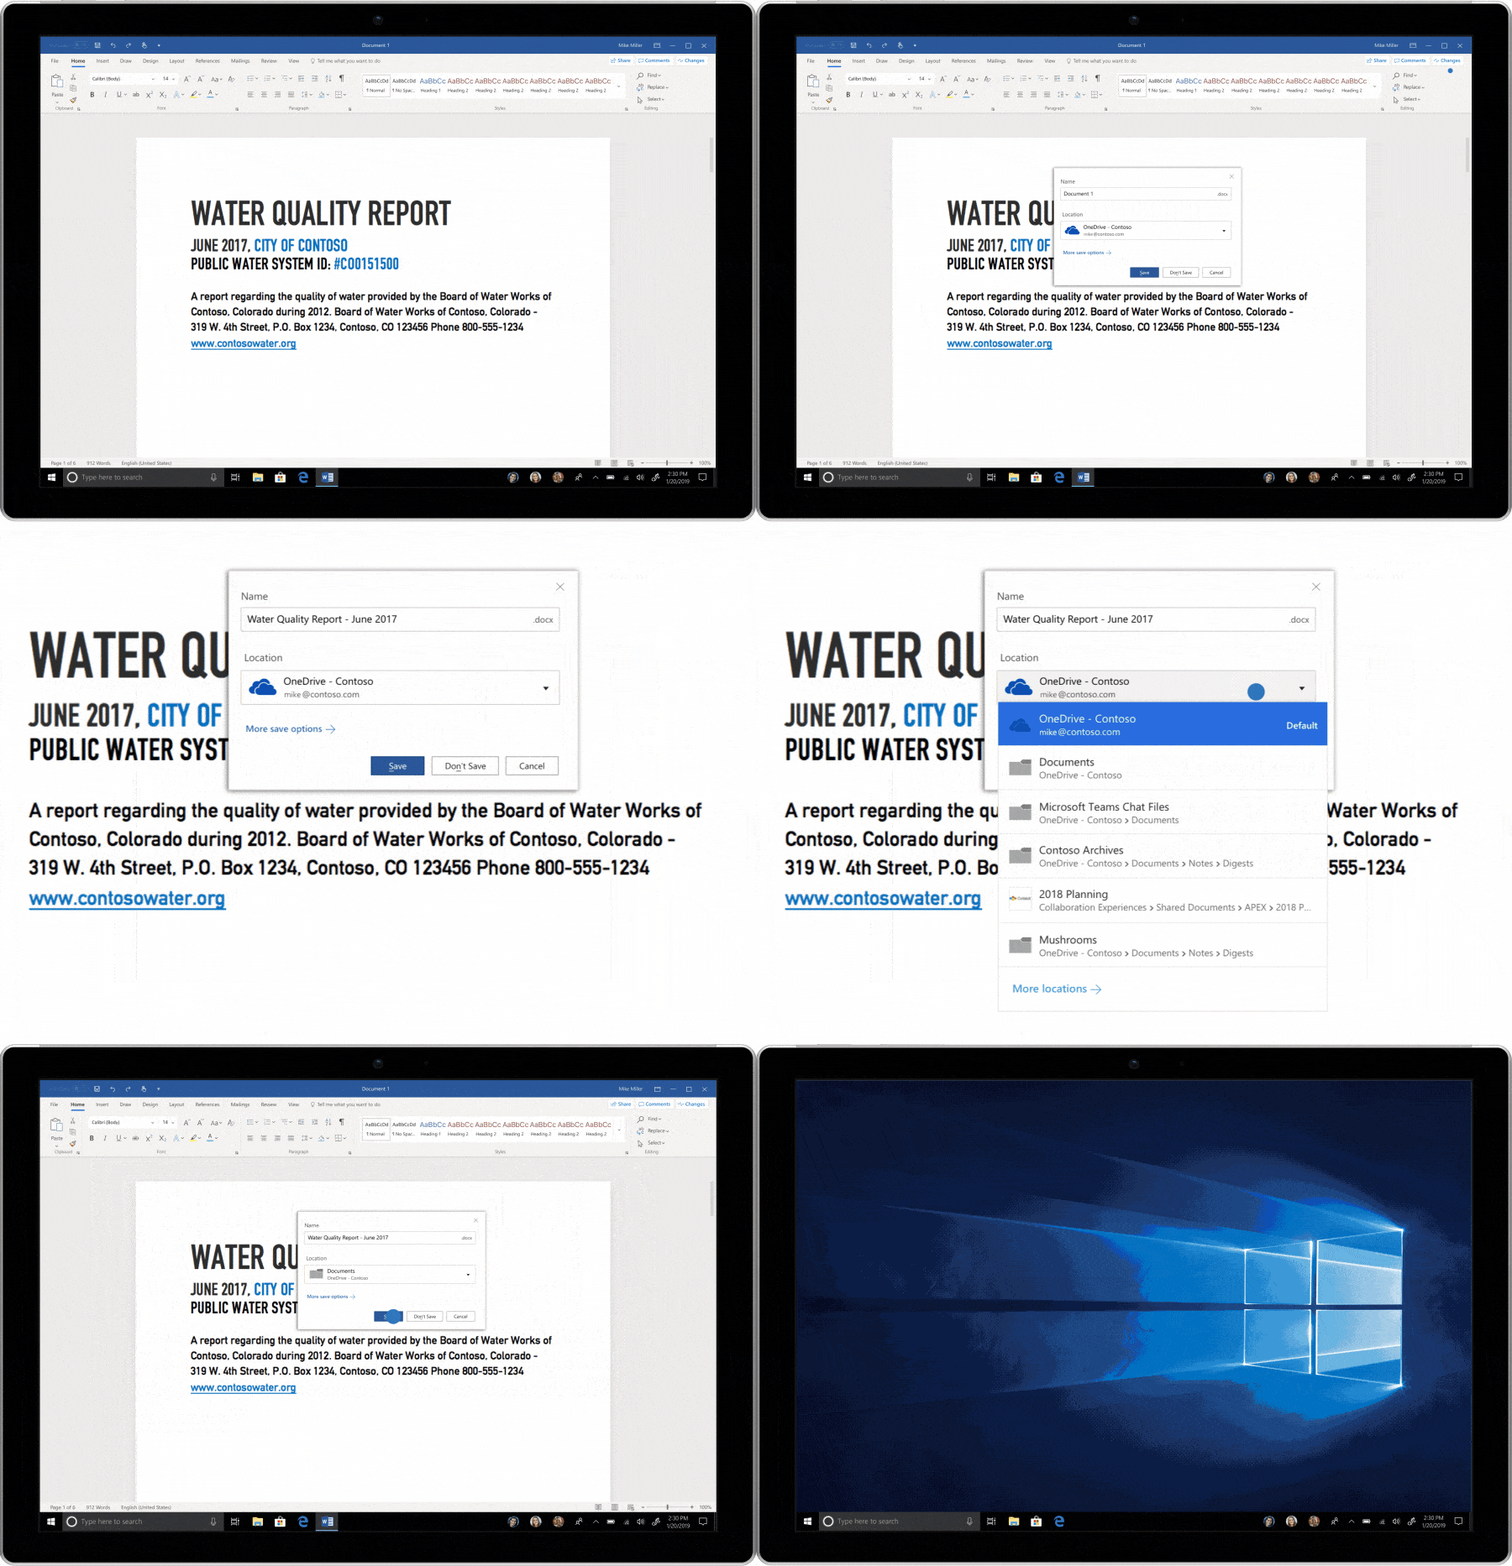
All you have to do is when you go to save a new Word, Excel or PowerPoint file from within your desktop app using Ctrl+S (Windows) or clicking on the ‘Save’ button in Office, you will see that a new dialog will default to OneDrive or SharePoint online giving you the option to quickly set the filename and location. Once it has been saved to the Cloud, you will then be able to access the document file from any device.
This GIF was created by Microsoft.
After this, if you do forget to save a new document before exiting, you’ll see an updated save experience which pushes you towards the Cloud. Here you will be able to access all your documents that you’ve saved to the Cloud, work with others and co-author documents straight away.
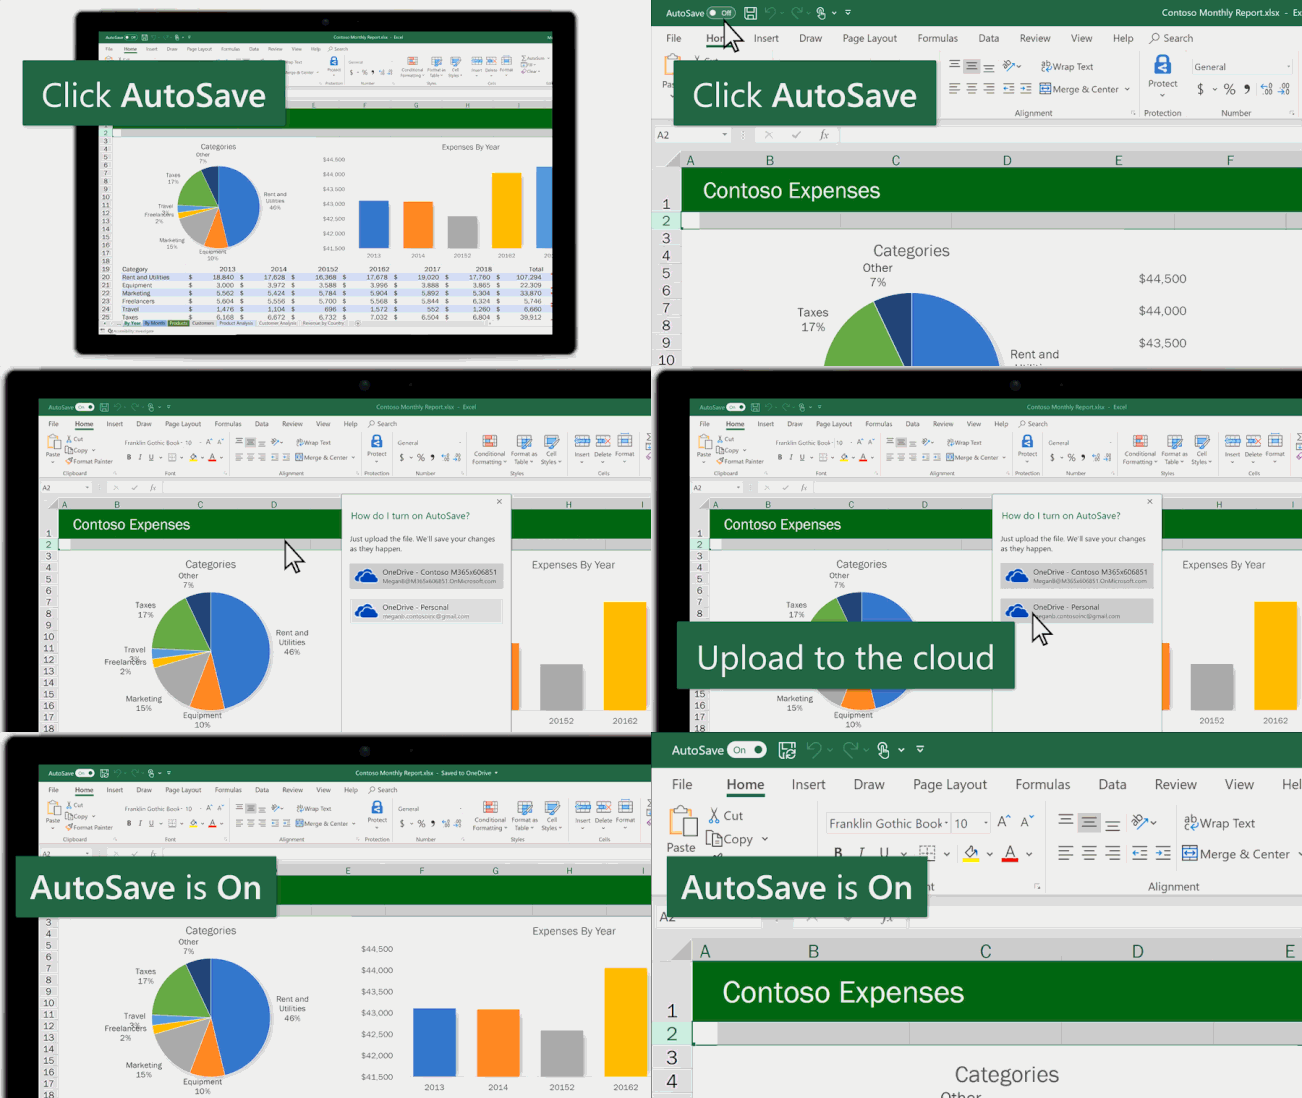
Another cool feature is the turn on autosave, which does what it says on the tin, as when a document is in the Cloud, AutoSave takes over to make sure that all your documents are synced up with the Cloud. Also, through the use of AutoSave, you never have to worry about clicking on Save or losing any changes you make, as these are done automatically.
If you see that the AutoSave toggle in the main navigation bar is off, simply flip it to turn it ‘On’ and store your file in OneDrive.
This GIF was created by Microsoft
If you are lucky enough to be using Office in the browser, this will be automatically enabled so all your documents are saved.
2 – Once you are within a shared Cloud document, you can co-author and even allocate tasks simply with the use of @mentions
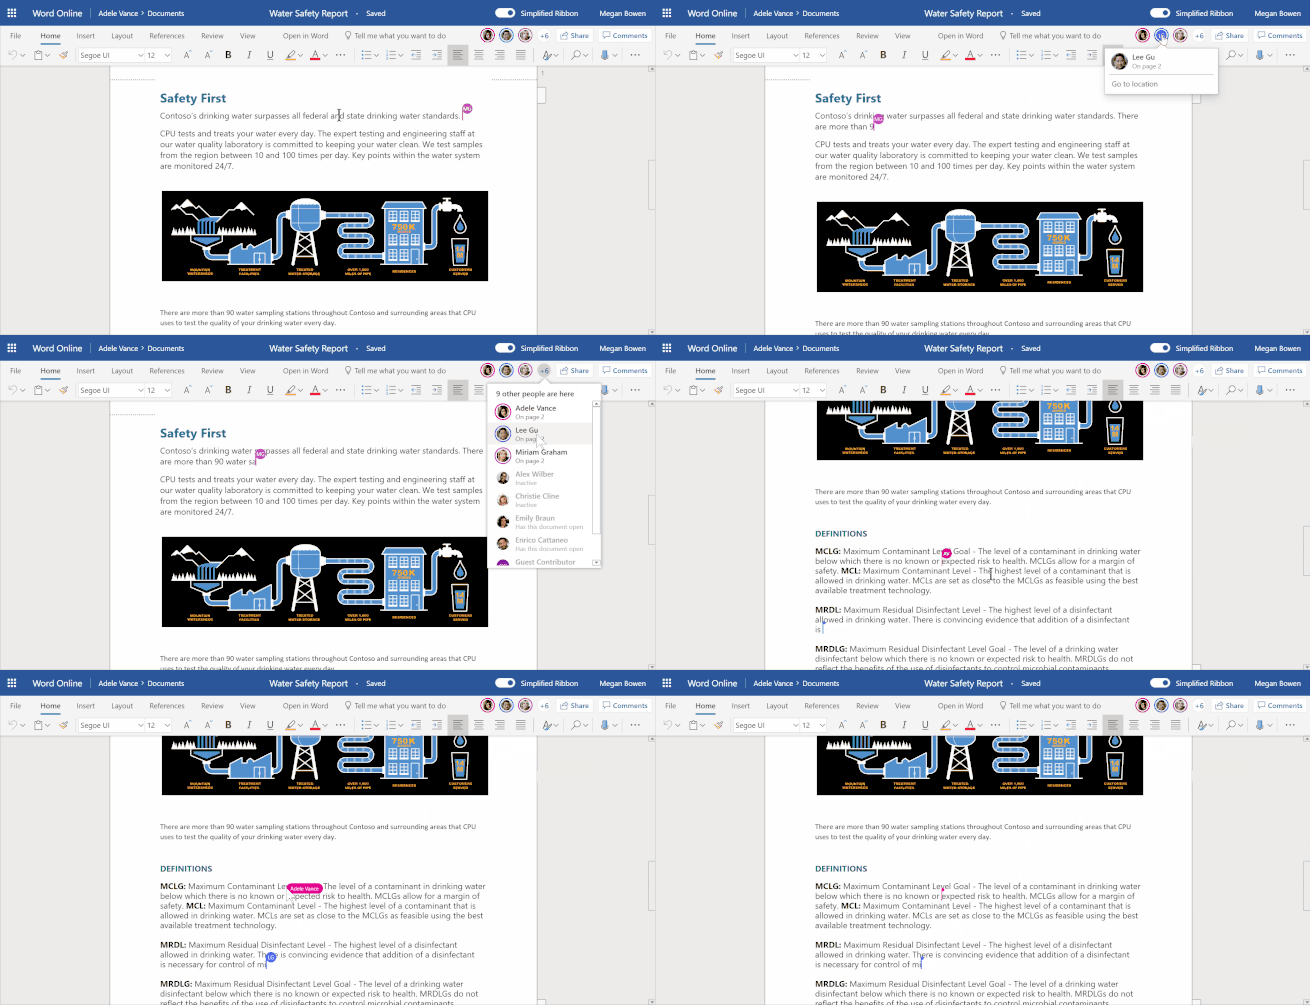
Stop wasting time combining changes from different documents and co-workers into one document and scanning through emails for the latest version of a file. All you have to do is simply share the Word, Excel or PowerPoint document with your peers and collaborate on it together from within one place.
Once you have shared a Cloud file, you will be able to work on the file in real time with multiple collaborators. If you are making changes at the same time, you will be able to see other collaborators changes as they happen. You can also co-author across multiple devices that suits you.
This GIF was created by Microsoft.
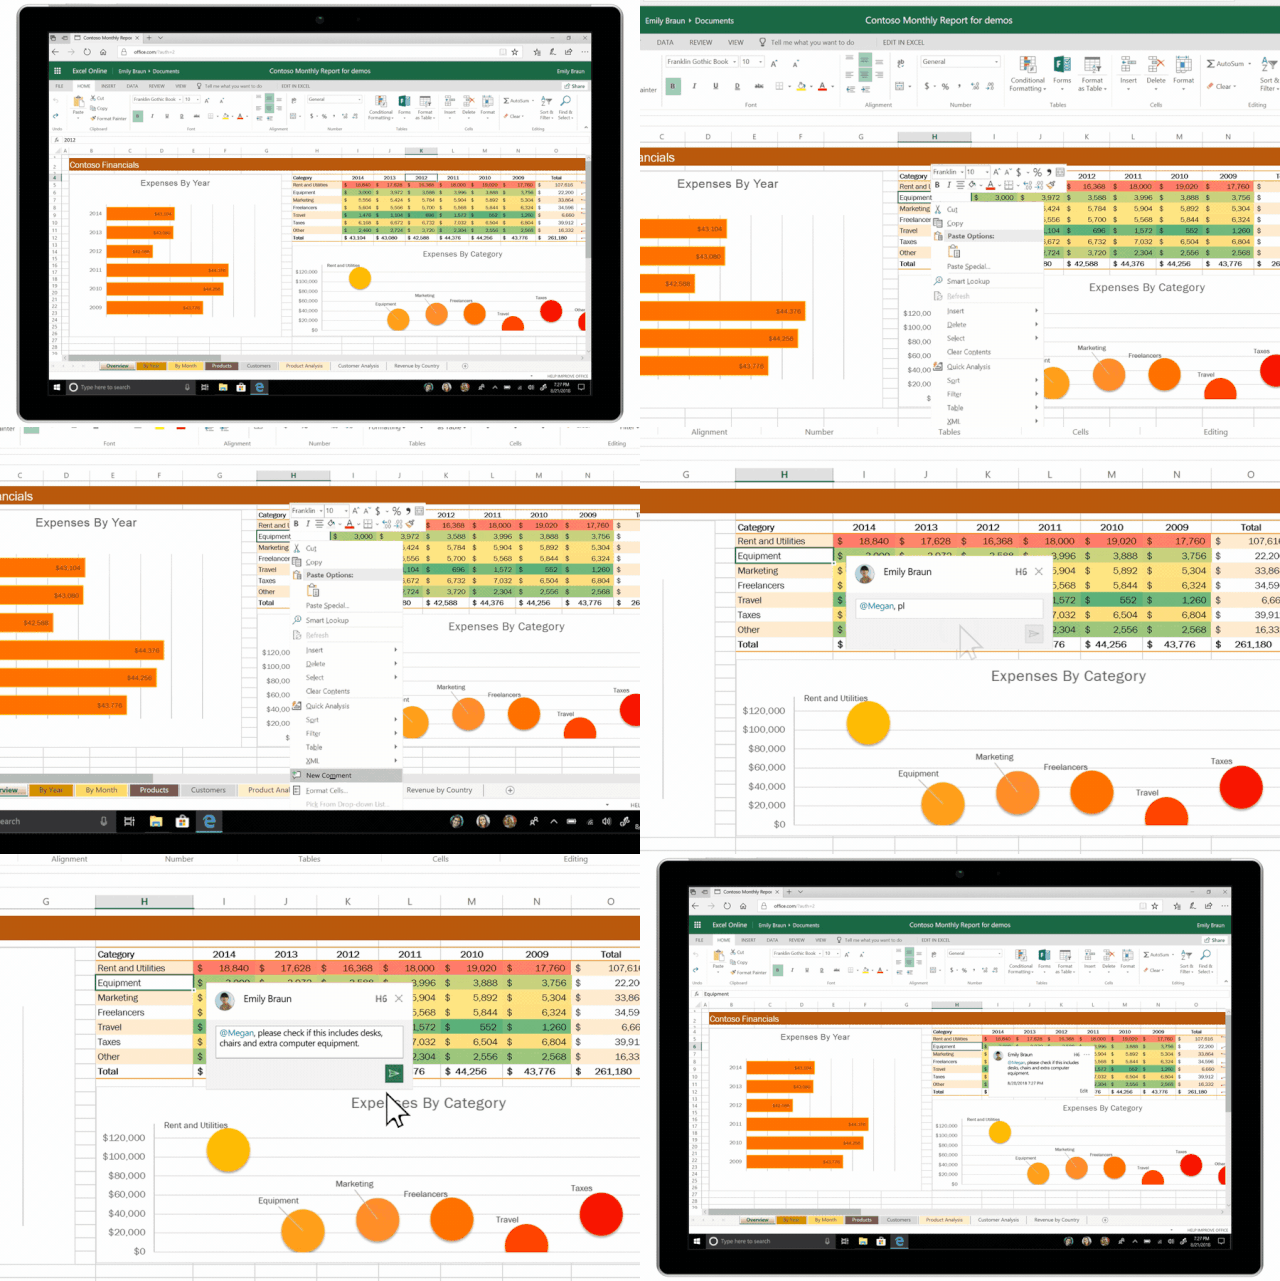
Another great feature is being able to work with your team through @mentions and threaded comments to ensure that you have an ongoing conversation happening beside the relevant content in Excel, Word or PowerPoint.
Threaded comments and @mentions will help to make sure that there is some context given on what’s happening and make it much more straightforward to have conversations with your fellow collaborators.
This GIF was created by Microsoft.
In order to use the mentions function, simply type ‘@’ and fill in the person’s name within the comment. This can be used to easily gain their attention as they will also receive an email notification which requires action.
3 – Work together in a shared document
See what’s been changed in your PowerPoint deck since your last visit
If you are working with your colleagues on a deck, you are able to easily find out about new changes, quickly get updated and begin your work almost straight away. Long gone are the days when you need to scroll through the whole deck for changes or comparing old and newer versions of your slides. You will be quickly informed on the changes made to the slides since your last visit and clearly see the things that have changed.
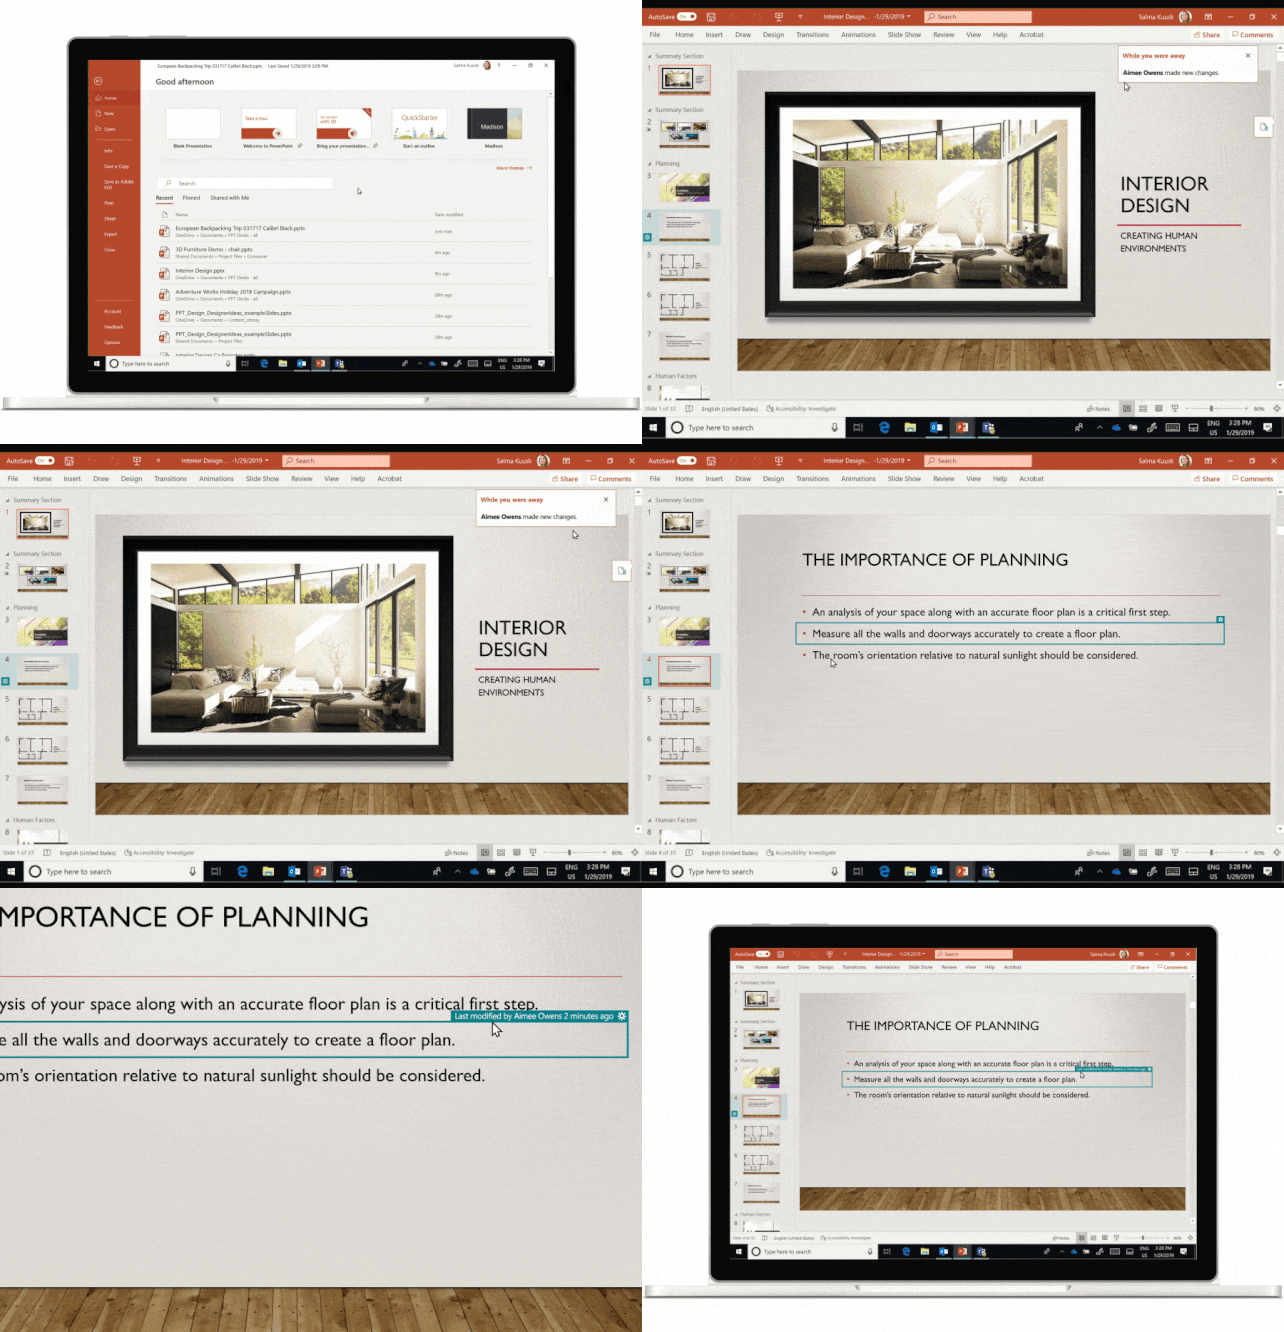
This GIF was created by Microsoft.
Change your file to Read-Only and set the permissions for how collaborators can use your file
Do you want to share a document with your peers but don’t want any changes to be made? Never fear, as you can do this by setting the permissions on a shared document to ‘Restrict Editing’ or ‘Always Open Read-Only'. By setting this up as read-only, you are making it clear that collaborators can't edit the document.
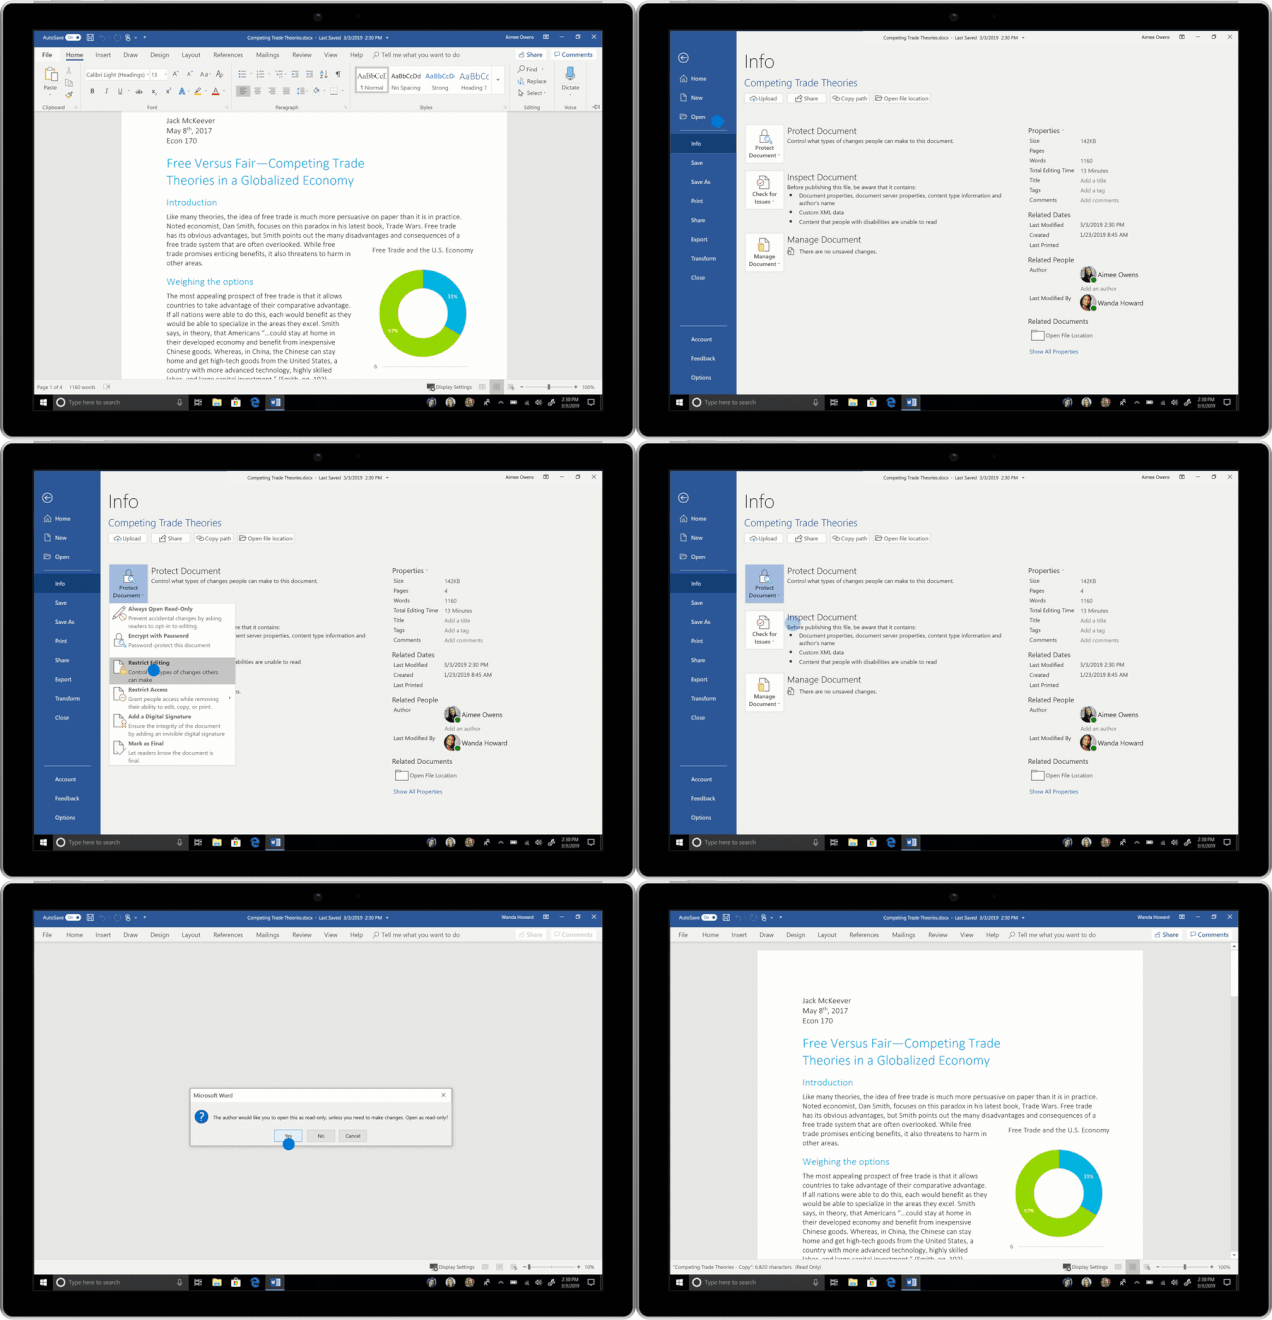
This GIF was created by Microsoft.
If the file is completed, you may want to use the ‘Mark as Final’ option.
Do you feel comfortable making changes in a shared document? Version history allows you to see what has been changed and change it back if you need to.
If a document is being used to form a new document, the best thing to do would be to get users to Save a Copy to ensure that the original file is intact.
If you do make a mistake and forget to do this while the AutoSave is on, don’t panic. You can see simply restore a previous version through version history. If you want a list of the previous versions of the file, simply go to ‘File’ followed by ‘Info’ then ‘Manage Document’.
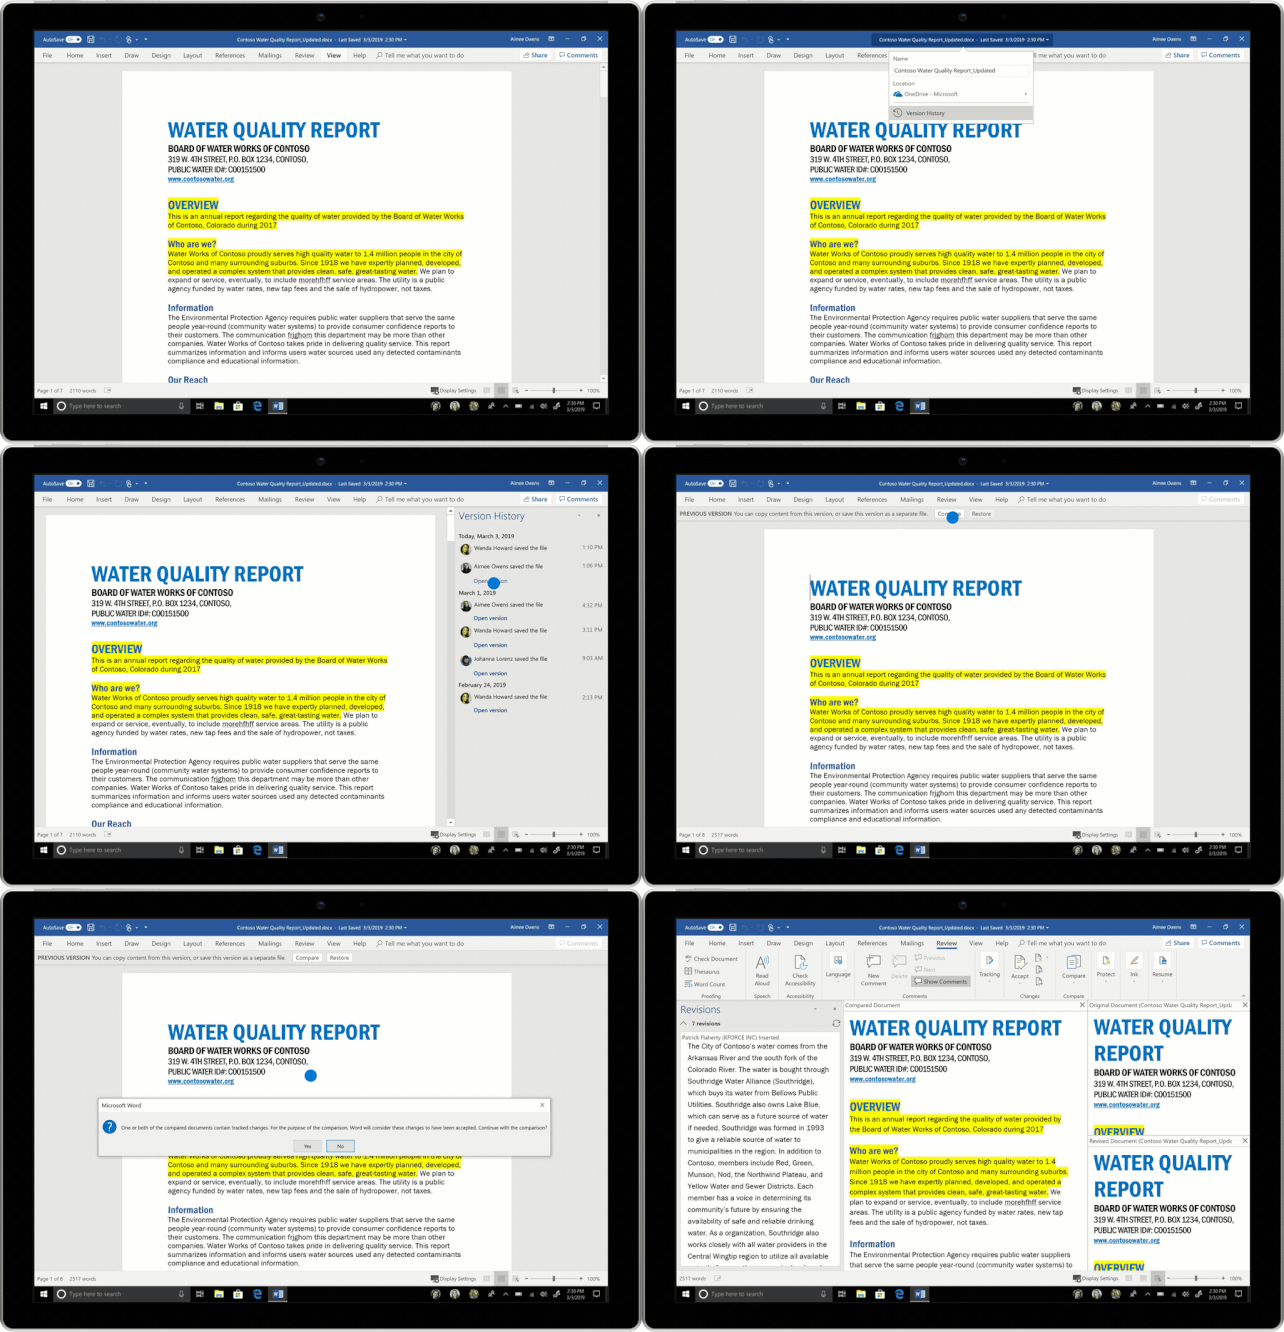
This GIF was created by Microsoft.
You also have the choice to select the title bar at the top of your document and select Version History to see who has made changes to the file and how it’s changed over time. Simply click on ‘Open Version’ to see how the older versions of the document compare to the newest versions.
If you don’t have a Office 365 subscription for your business, need specifically tailored Office 365 training or want to discuss how you can get more out of it, then please contact our Managed Services team today for more info.
If you want to receive tips and tricks like the above directly into your inbox then please sign up to our mailing list today.


