If you use Dynamics GP on a regular basis, you may find yourself in the scenario where you want to add assets to the fixed asset module, however you don’t want them to impact on your General Ledger.
You may be thinking of doing this for a number of reasons with the most popular reason likely to be that you want to use the Fixed Asset module within your GP solution and all the functionality that comes with it. This will help to ensure that you don’t have to track assets through Excel which could cause data errors and is very labour intensive.
In our latest tips and tricks article, we will show you how to add assets that don’t flow to the General Ledger in Dynamics GP. In order to do this, you will need to set this up first which can be achieved by following the steps below:
Step 1: First of all, you will need to go to your Fixed Asset setup to find out what your default Book is which you can do by logging into your GP solution, then going to ‘Tools’ followed by ‘Setup’ and then ‘Fixed Assets’ and ‘Company’.
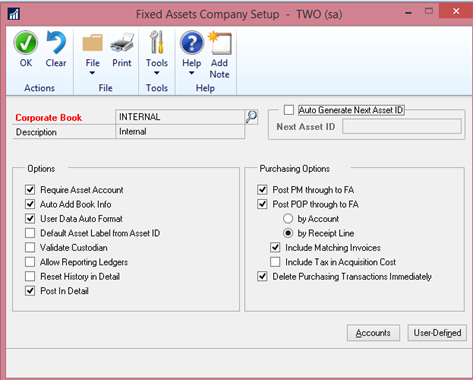
NB: The ‘Internal’ Book that is shown within this window is your default Book where, if used, will post to your General Ledger. You will need to remember this for the other steps below so make a note of the name of the book then shut the window.
Step 2: You will now need to create a brand new Corporate Book which you can do by going to ‘Tools’ followed by ‘Setup’ then ‘Fixed Assets’ & ‘Book’. When here select ‘Clear’ and then provide the new book with a Book ID. Do not check mark the box ‘Auto Add Book Info’.
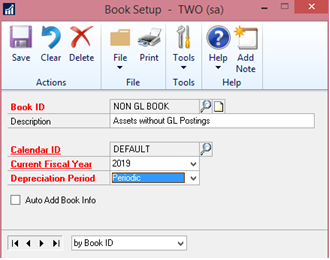
Step 3: After you have completed the above step, you will now need to create a new Class ID for these assets that you don’t want to hit the General Ledger. To do this, go to ‘Tools’ followed by ‘Setup’ and then ‘Fixed Assets’ and ‘Class’.
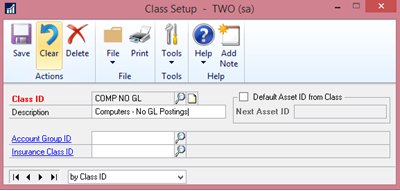
Here you can name the class in whichever way you want and add a suitable description and leave the other fields empty.
Step 4: Now what you need to do is setup the Book Class to be able to link the newly created Book ID and Class ID, to do this go to ‘Tools’ then select ‘Setup’ and then go to ‘Fixed Assets’ and ‘Book Class’.
.png)
When you get to the Book ID and Class ID fields select these from the ones you setup in Steps 2 and 3 respectively, then complete the rest of the fields like you normally would.
Step 5: At this point, you are now ready to add the assets, you can do this in a similar way to how you normally do this but with one additional step. First of all, go to ‘Cards’ followed by ‘Fixed Assets’ then ‘General’.
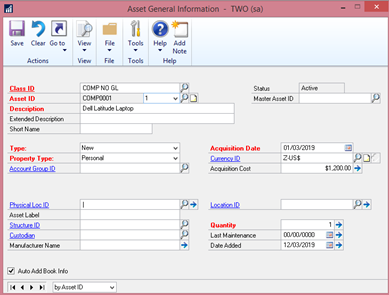
For the Class ID, select the one that you setup in Step 3 above then complete the rest of the fields like normal through the use of a naming convention that you want to see for your Asset ID (eg. Tool 1, Tool 2).
Before you select save, ensure that the ‘Auto Add Book Info’ box is left unchecked!
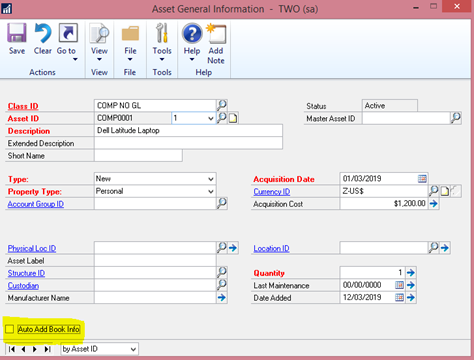
NB: If you do leave the box checked then save it, you will find that it has been added to all the Books, including the one we discussed in Step 1, therefore it will create a General Ledger posting.
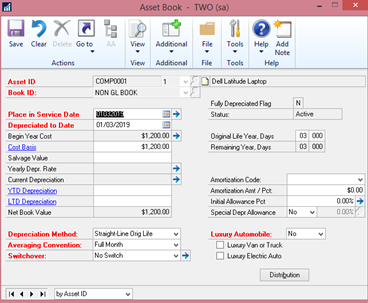
After you have hit the save button, you will need to go to the Book screen via the Goto Drop Down Menu at the top of the Asset Maintenance Screen:
From the dropdown menu for Book ID, select your recently created Book that you setup in Step 2 above, then select the ‘Save’ button.
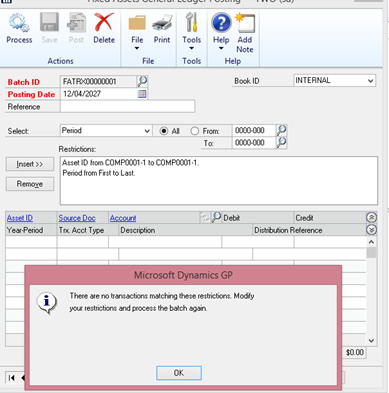
From now on in, if you do your General Ledger posting step and hit the ‘Process’ button, you shouldn’t be seeing any General Ledger entries for the assets you added to the Fixed Asset Module above. This will help to confirm that it has worked and that assets are now in the Fixed Assets module without being recorded in the General Ledger.
If you would like help setting up the above, are looking to upgrade your existing GP solution, need extra GP support or extra tailored GP training, then get in touch with our team of GP experts who will be more than happy to help you.
If you want to receive articles similar to the above, straight into your inbox then don’t forget to join our mailing list.


.png)


